

Team edition
The Team edition lets several people work with a single company configuration, keeping the people who look after it separate from the people who use it and contribute to the memories. Roles come from the permissions of your git account: there is nothing to configure in the app.
Two repositories
Team setup asks for two repositories:
- CORE repository — governed configuration: the team’s shared configuration (rules, skills, commands, agents). Maintainers change it, members receive it.
- MEMORIES repository — team memories: project memories and the machine registry. Everyone contributes to it.
This way the company keeps a consistent configuration, which changes only when a maintainer decides so, and each person keeps building up and sharing their own project memories.
Roles and permissions
The role is not set in the app: it depends on your account’s permissions on the CORE repository. Whoever can write to it is a maintainer; whoever can only read it is a member.
| Role | CORE | MEMORIES | What they can do |
|---|---|---|---|
| Maintainer | write | write | Looks after the shared configuration and plugins, decides on proposals, generates invitations, maintains the repositories, deactivates machines and merges projects. |
| Member | read | write | Receives the configuration, contributes to memories and proposes changes to the maintainer. Other people’s details are hidden in the team lists. |
Team defaults
Some of the maintainer’s choices become the team defaults: for example the automatic sync cadence, the memory options and the number of sessions to keep. The other machines inherit them at the next sync.
Inheriting doesn’t overwrite your choices: if you’ve already set one of those options yourself, yours stays. Team values only fill in what you haven’t decided yet, so a new machine starts out already in line with the team.
Proposing changes to the team
A member doesn’t change the shared configuration, but can propose to the maintainer a skill, a rule, a command, an agent, a hook or a custom plugin: a new item, or their own version of an item the team already has. The maintainer reads the files, accepts or declines with a reason, and the member sees the outcome in the history of their proposals.
The changes a member makes on their own machine to team items stay on that machine until the team publishes a new version of the same item. At that point the team version goes into use, and the member’s version is kept in the Overview, under Waiting for your decision: they can compare it, keep it and propose it, or let it go. The whole flow is in Proposals to the team.
Deleting and reviving shared items
When a maintainer deletes a shared item (a skill, a rule, a command, an agent, a hook or a custom plugin), the item disappears from every machine on the team at the next sync and doesn’t come back. Members don’t need to do anything.
To get that name back, the maintainer uses Revive in the Deleted by the team list, at the bottom of each section of the Claude system tab. Revive allows the name again, so the item can be created and shared again; the previous content can be recovered from the repository history or from a backup.
Joining a team
If you received an invitation code (it starts with KNMI-), in a single step you activate the
team license and connect the repositories with your git account.
-
Paste the code.
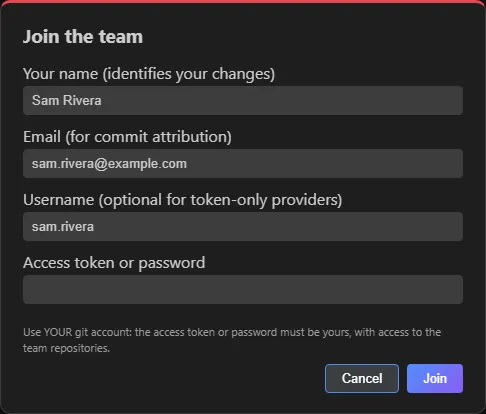
On the first-launch screen, in the Have a license or a team invitation? panel, paste the code into the Paste your license code or team invitation code field and click Activate. The Join the team window opens.
-
Enter your details.
Fill in Your name (identifies your changes), Email (for commit attribution), Username and Access token or password of your own git account. The token or password must be yours and have access to the team repositories.
-
Click Join.
The team license is activated and the two repositories are connected with your credentials. From here, syncing works as usual.
The Team tab
With the Team edition the dashboard has a Team tab:
- Your identity. If this machine doesn’t have a name or an email yet, a card asks you for them: click Save. The email lets your git server attribute the changes you send to you. You can change them later in the VS Code settings, under Claude Sync.
- Proposals. Members’ proposals and the maintainer’s decisions (see above).
- Members. The list of people with their machines and role (Maintainer / Member ).
- Issued invites. For the maintainer: date, author, expiry and status of each invitation (pending, redeemed, expired).
- How roles work. A summary of the roles.
Generating an invitation code
- First of all, give your colleague access to the two repositories on your git server.
- In the Team tab, click Generate invite code.
- In the Invite code — valid 72 hours, single use window, click Copy or Send by email and send it to your colleague.
Only maintainers generate invitations. If you need a code for a new colleague, ask one of the team’s maintainers.
See also
- First launch and setup: license and repository.
- Proposals to the team: how a member brings their work into the shared configuration.
- Repository maintenance: the operations on the two repositories.